
A lot of teams start the same way. They buy a big screen, mount a camera, drop a speakerphone on the table, and assume the conference room setup is done.
Then the first important hybrid meeting starts. The laptop can’t see the room camera. Remote attendees hear the room twice. Someone sits too far from the mic. The shared screen looks washed out. IT gets pulled in, the meeting starts late, and everyone leaves thinking the technology is the problem.
Usually, it isn’t. The problem is that the room was treated like a shopping list instead of a project.
A reliable conference room setup has to be planned the way you’d plan any other business-critical system. The room itself matters. The network matters. The audio design matters. The user workflow matters. If any one of those pieces is weak, the whole experience feels unreliable. That’s why the rooms that work best aren’t always the ones with the fanciest gear. They’re the ones where the equipment, wiring, acoustics, software, and training were designed to work together.
Beyond Just a Room with a Screen
The failed meeting is usually predictable.
A team books the room for a client call. The display turns on, but the video platform doesn’t launch correctly. Someone grabs an HDMI adapter from another room. The in-room participants can hear each other, but the remote side keeps asking people to repeat themselves. By the time the room is usable, the first ten minutes are gone.
That’s not a hardware issue by itself. It’s a planning issue.
A proper conference room setup starts before anyone orders a camera or display. You need to know what kind of meetings the room supports, how people join those meetings, whether the room network can handle real-time traffic, and how the space sounds when several people speak at once. Teams often skip those questions because they feel slower than buying equipment. In practice, they save time, money, and support calls.
Practical rule: If a non-technical employee can't walk in, join a call, share content, and be heard clearly without help, the room isn't finished.
This applies whether you’re building one huddle room or standardizing several spaces across an office. The same thinking shows up in other live sound environments too. A useful example is this church sound system setup guide, because it treats audio, room behavior, and operator workflow as one system instead of separate purchases.
The conference rooms that hold up over time are built the same way. They’re managed like projects with a scope, timeline, infrastructure phase, commissioning phase, and user handoff. That approach is what prevents choppy calls, mystery cable problems, and rooms that look expensive but still frustrate everyone who uses them.
Planning Your Spaces by Size and Purpose
Room planning decides whether this project stays manageable or turns into a string of one-off fixes. If every space gets labeled "conference room," teams usually buy too much for low-value rooms and too little for the rooms that carry customer calls, executive reviews, or training.
Usage patterns in many offices have shifted toward smaller, faster meetings, but you do not need a borrowed statistic to see it. Check your calendar data, walk the floor for a week, and note what happens in each room. In most first-time deployments I work on, the busiest spaces are the small rooms people can enter, join from a laptop, and leave without needing help.
Start with room roles, not product catalogs
Assign each room a job before anyone compares cameras, displays, or room bars.
That job should be specific. Internal standups, hiring interviews, sales demos, executive meetings, recurring hybrid team calls, and training sessions all place different demands on the room. A space used for screen sharing and quick discussion can stay simple. A room used for client presentations needs stronger camera framing, cleaner audio pickup, and more predictable control.
Conference room setup stops being a shopping exercise and starts acting like a project. The room role drives the layout, the AV package, the network prep, the install scope, and the support plan after launch. That order matters because it keeps the design tied to business outcomes, such as faster meeting starts and no more choppy video calls caused by weak Wi-Fi or unmanaged traffic. If your team needs a refresher on what causes packet timing problems during calls, this explanation of jitter in networking during real-time traffic is a useful reference.
Skipping this step usually creates two expensive mistakes:
- Overbuilding small rooms: The company pays for premium features in a room used for two-person check-ins and quick laptop calls.
- Underbuilding key rooms: The room used for customer meetings ends up with poor mic coverage, bad sightlines, and display choices that look fine on paper but fail in real use.
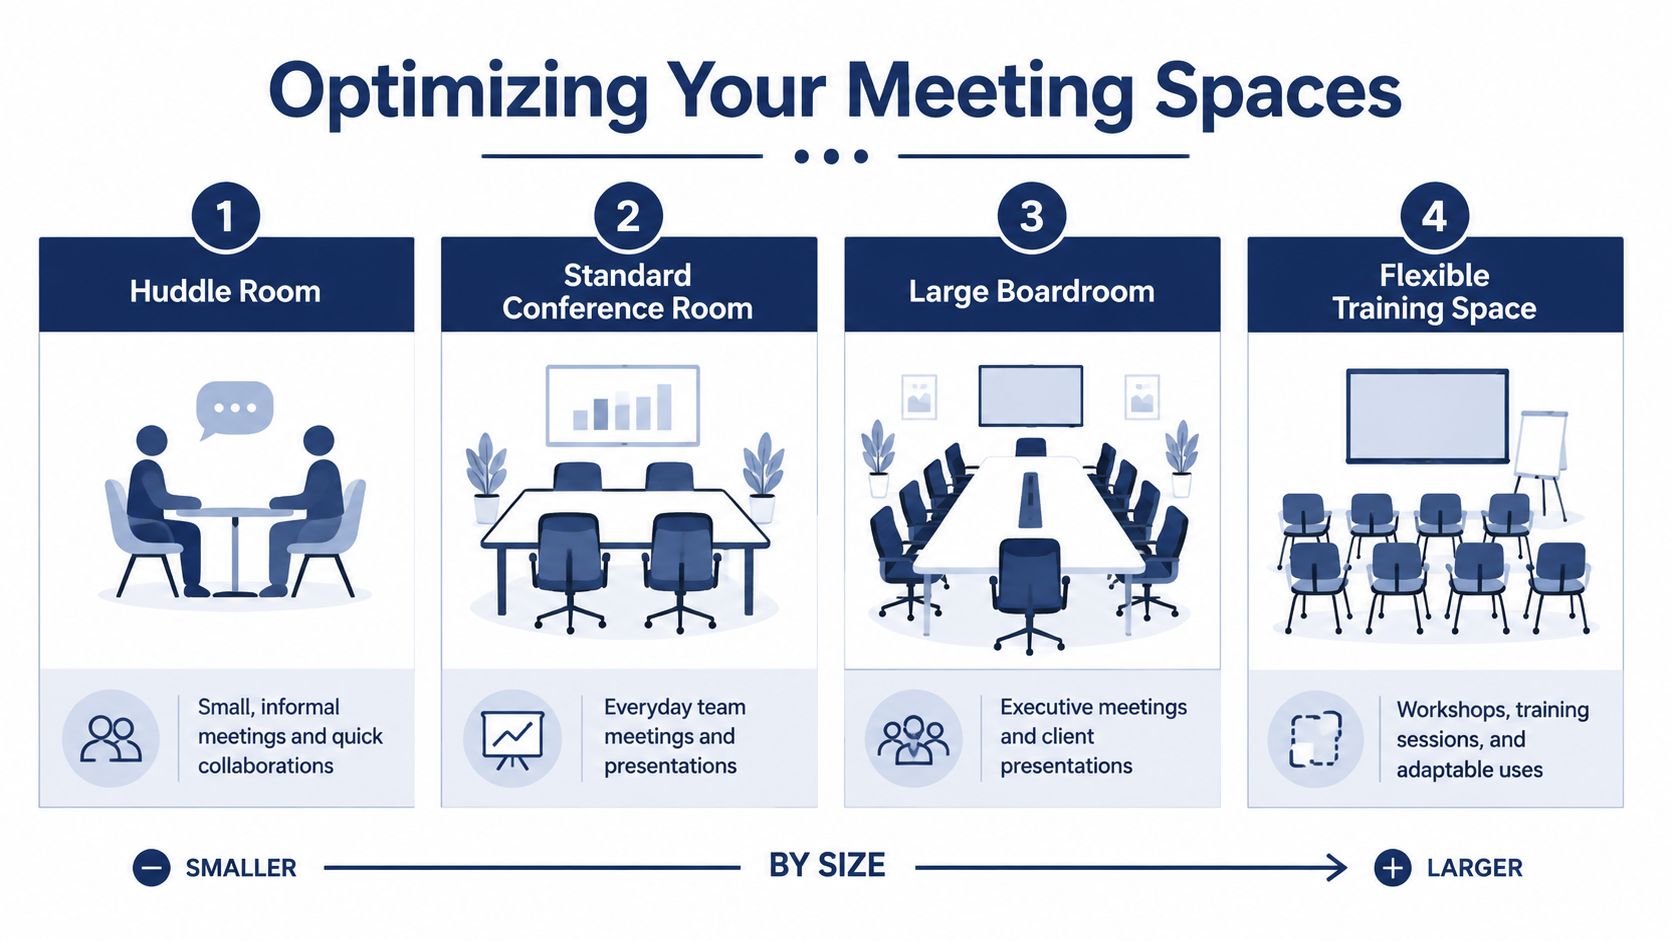
Conference Room Tiers at a Glance
| Room Type | Capacity | Primary Use Case | Typical Tech Level | Budget Tier |
|---|---|---|---|---|
| Huddle Room | Small group | Quick internal syncs, short hybrid check-ins, impromptu collaboration | All-in-one bar, single display, simple content sharing | Lower |
| Mid-Sized Room | Team meeting group | Department meetings, recurring hybrid collaboration, interviews, customer calls | Larger display, better mic coverage, dedicated room controls or streamlined BYOD | Mid |
| Boardroom | Larger group | Executive meetings, client presentations, formal decision sessions | Advanced audio processing, PTZ camera coverage, larger display strategy, tighter room control | Higher |
| Flexible Training Space | Variable group | Workshops, training, adaptable use | Reconfigurable furniture, presentation-first layout, scalable audio and video | Variable |
Standardize the rooms that repeat
Once the roles are clear, build templates for the room types you expect to repeat. Standardization does not mean every room is identical. It means similar rooms use the same design rules, the same join method, the same support model, and a similar cable and control approach.
That pays off fast. Users do not have to relearn how to start a meeting in every room. IT does not have to support five different content-sharing paths for spaces that serve the same purpose. Replacement parts, firmware updates, and troubleshooting also get easier because the rooms behave the same way.
I usually tell clients to standardize the 80 percent case and make deliberate exceptions for the rooms that earn them. A boardroom may need separate microphones, camera presets, and tighter control logic. A huddle room usually does not.
Rooms should feel familiar. Familiar rooms get used. Confusing rooms get bypassed.
Ask the questions that shape the design
Use these questions before procurement, while changes are still cheap:
- Who uses this room most often? Executive teams, sales staff, engineering groups, support leads, and trainers all run meetings differently.
- How do meetings start? A scheduled room system, walk-in BYOD, or a mix changes the control design.
- Is the room content-first or conversation-first? Presentation-heavy rooms need better sightlines and display planning. Discussion-heavy rooms depend more on microphone coverage and echo control.
- Will furniture stay fixed? Movable tables and chairs affect camera framing, microphone pickup, and floor box placement.
- Is the room client-facing? A room used for external calls usually needs a more polished experience than an internal overflow space.
- What failure is least acceptable? In some rooms, losing screen share is the big problem. In others, bad audio is what kills the meeting.
Those answers create scope. Scope leads to better budgeting, fewer late changes, and fewer arguments during install. More important, they keep each conference room setup tied to the reason the room exists in the first place.
Selecting the Right AV and Conferencing Gear
Monday at 9:00 a.m., the executive team joins a client call from a brand-new room. The display looks great on the wall. The camera crops people at the ends of the table. Remote participants ask speakers to repeat themselves. Someone hunts for the right cable while the meeting burns its first ten minutes.
That failure usually starts in procurement, not in the meeting.
Gear selection works when it follows the room plan you already built. The goal is a room that starts quickly, sounds natural, and stays predictable for every team that uses it. Good conference room setup is a project decision, not a pile of product choices.
Match the display to the room, not the wall
Display size should be driven by reading distance and content type. If people need to review spreadsheets, dashboards, or small text, an undersized screen will hurt the meeting no matter how sharp the panel looks. That is why I push clients to decide what participants must see from the farthest seat before choosing display size.
A huddle space often does fine with one commercial display and a video bar. In a larger room, the screen may need to be bigger, mounted lower, or doubled up so people can follow both faces and shared content without squinting. Analysts at Mount-It note in this conference room AV setup reference that screen readability drops when viewing distance gets too long for the display size. In practice, that means teams stop using the room for detailed content and fall back to laptops, which defeats the point of the room.
Commercial displays also earn their cost over time. They handle long operating hours better, wake up more predictably, and integrate more cleanly with room controls.
Choose cameras for seat coverage, not feature count
Camera selection should start with one question: can remote participants see every speaker clearly without the room fighting the camera?
Small rooms usually benefit from less complexity. A wide-angle all-in-one bar is often the right call when everyone sits close and meetings need to start fast. Add too much camera logic in a simple room and you get odd framing, delayed switching, and more support tickets.
Larger rooms change the math. Long tables, side seating, and presenters who stand up or move around often need a PTZ camera, a multi-camera design, or at least tighter framing control. Auto-tracking can help, but only if it reacts reliably and does not cut away every time someone shifts in a chair. Fancy tracking on a spec sheet does not matter if remote attendees keep seeing the wrong person.
Audio should follow table shape and room behavior
Audio is where rooms succeed or fail. People will forgive a camera that is merely decent. They will not forgive choppy speech, hollow voices, or participants who sound ten feet away.
The right microphone approach depends on how people sit and talk. A short table in a huddle room may be covered well by the microphones built into a quality video bar. A medium room with people spread out across a wider table often needs dedicated mic pods. A long boardroom usually needs a separate audio design, with microphone placement, speaker placement, DSP, and acoustic control treated as their own workstream.
Use this as a starting point:
- Huddle rooms: All-in-one bars work well when every seat stays within reliable pickup range.
- Mid-sized rooms: Add dedicated microphones when speakers sit farther apart, face displays off-axis, or interrupt each other frequently.
- Boardrooms: Treat audio as a full system design. Camera choice alone will not fix weak pickup or poor echo control.
If remote participants say the room sounds distant, the problem is rarely the meeting platform. It is usually microphone distance, loudspeaker placement, room reflections, or a mix of all three.
For teams that want a broader vendor-neutral perspective before locking in hardware, this guide to video conferencing setups is a useful comparison.
Room system or BYOD
This decision affects support load, user behavior, and how often meetings start on time.
A dedicated room system gives shared spaces consistency. Users walk in, tap to join, and get the same workflow every time. IT gets one standard to manage, patch, and monitor. That makes sense for executive rooms, high-use spaces, and any room booked by many different teams.
A BYOD setup gives users more app flexibility. It works well in casual spaces or in organizations where teams switch between multiple conferencing platforms. The trade-off is that flexibility often creates friction at the table. Wrong adapters, missed audio routing, and cable confusion are still common failure points.
| Approach | What works well | What usually goes wrong |
|---|---|---|
| Dedicated room system | Consistent user experience, easier support, cleaner startup flow | Less flexibility if teams rely on many unmanaged apps |
| BYOD | Flexible for mixed platforms, familiar to users who prefer their own laptop | Cable confusion, adapter issues, inconsistent user behavior |
There is no universal winner. I usually recommend standardizing on one primary experience for most rooms, then making exceptions only where the business case is clear. That keeps training simpler and cuts down on “every room works differently” complaints.
If your office still depends on personal endpoints alongside room systems, keep those standards aligned too. This roundup of best VoIP phones for small business is a useful reference when you want desk phones, common areas, and meeting rooms to feel consistent instead of stitched together from different purchasing cycles.
Buy for supportability
Launch day is not the finish line. The better question is what your team can still support six months later without calling the integrator for every small issue.
Choose gear with standard connections, sensible mounting, replaceable cables, and management tools your IT team will use. Platform flexibility matters. So does having parts that can be swapped without opening walls or rewriting the whole room design.
The best room is rarely the one with the longest feature list. It is the one people trust to start on time, carry a clear conversation, and stop wasting staff time on preventable meeting problems.
Wiring, Network Prep, and Physical Installation
The room looks finished. The first all-hands starts at 9:00. At 9:07, the far end is hearing clipped audio, the table cable is already loose, and nobody can tell whether the problem is Wi-Fi, the switch, the USB connection, or the room PC.
That failure usually starts weeks earlier.
Wiring and network prep are where conference room projects either get controlled or get expensive. Treat this phase like infrastructure work with dependencies, owners, and sign-off points. If it gets handled as last-minute installation labor, the room may still power on, but it will not behave predictably under real meeting load.
Build the room in the right order
A good install follows a sequence for a reason. Room assessment comes first. Then cable paths, power, switching, mounting points, and only then the visible hardware.
I usually break this phase into four workstreams:
- Site verification: Confirm wall construction, ceiling access, table location, conduit routes, floor box position, and actual power availability.
- Infrastructure prep: Pull and label cable, confirm switch ports and PoE budget, set network policies, and install backing or mounts before finish work blocks access.
- Physical installation: Mount displays, cameras, microphones, speakers, touch panels, and compute devices. Terminate cleanly and document every endpoint.
- Validation: Test calls, screen sharing, cable failover, wake behavior, and recovery after a reboot or network interruption.
Compressing those steps is how projects end up with visible raceways nobody wanted, missing power where the equipment lands, or a camera mounted perfectly for an empty room but badly for seated participants.
Cable for the room you will have in three years
The cheapest cable plan is usually the one that creates the first upgrade problem.
Cat6A is a solid baseline for new conference room builds because it gives more headroom for current bandwidth needs and reduces regret later when you add another display, a DSP, a scheduling panel, or networked peripherals. In smaller rooms, standard USB-based kits can still work well, but only if cable length, extension method, and power delivery are planned together. On larger rooms, I prefer dedicated home runs for table connectivity, room compute, display locations, control, and any networked audio endpoints.
One cable to the table is rarely enough.
Leave spare capacity where the walls are open. Extra labeled runs cost far less during construction than after furniture, finishes, and schedules are in the way.
Power and mounting decisions affect daily usability
Clients often focus on the display size and camera model. Users notice whether the screen is too high, whether the table blocks the camera shot, and whether anybody can service the room without taking half the front wall apart.
Check these items before hardware shows up:
- Wall support: Large displays need proper backing, not assumptions.
- Display height: Keep it comfortable for seated viewing and natural camera alignment.
- Camera sightline: Verify framing from real seats, not from the doorway.
- Table placement: Make sure microphones, cable access, and participant positions all work together.
- Service access: Leave a path to power supplies, network ports, and terminations.
- Ventilation: Small cabinets and credenzas overheat fast when room PCs, switches, and AV gear share the same enclosed space.
Those choices change support costs. They also change meeting behavior. A room that is awkward to use gets bypassed, even if the spec sheet looked excellent.
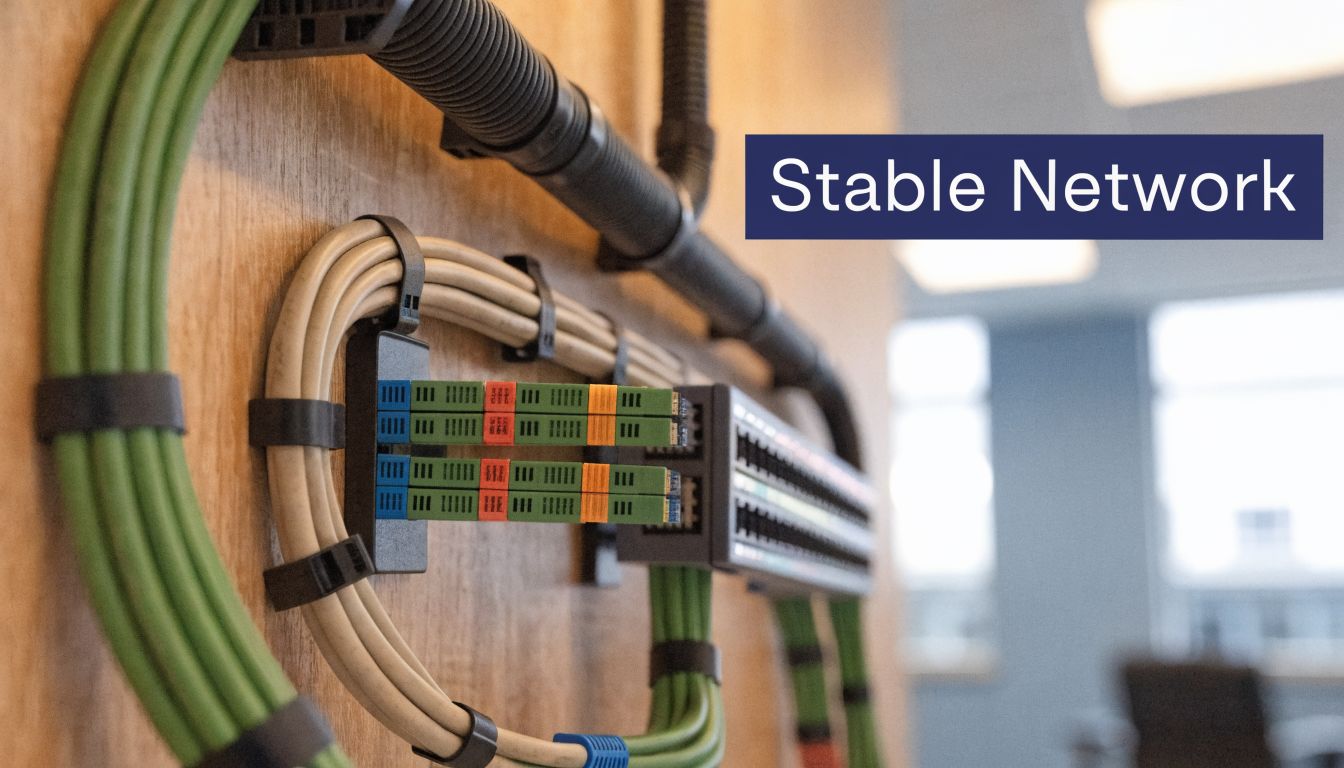
Prepare the network for real-time traffic
Conference room devices do not behave like ordinary office endpoints. They are sensitive to latency, packet loss, and timing variation. On a busy office network, those problems show up as frozen video, delayed speech, or robotic audio long before anyone opens a ticket.
Separate AV and conferencing gear logically where it makes sense. In many environments, that means a dedicated VLAN, clear addressing, and QoS rules that prioritize real-time traffic over less time-sensitive transfers. The exact design depends on your network standards and security model, but the goal is straightforward: keep calls stable when backups run, large files sync, and the office is fully active.
For teams that need a plain-English explanation of one of the call quality issues that keeps showing up during room troubleshooting, this guide to what jitter means on a business network is a useful reference.
Also confirm the basics that get missed more often than they should. PoE budget. Switch port count. DHCP reservations or static assignments where required. Firewall rules for the conferencing platform. DNS that resolves quickly and consistently. None of that is glamorous, but all of it decides whether the room feels dependable.
Installation quality shows up later
Clean terminations, labeled patching, documented port maps, and consistent device names matter long after the installers leave. They cut troubleshooting time, reduce finger-pointing between AV and IT, and make future changes much safer.
That is the bigger point here. A successful conference room setup is not a pile of purchased gear installed in one visit. It is a managed project where wiring, network prep, and physical installation are coordinated early enough that the room works the same way on launch day, three months later, and during the meeting that matters most.
Configuring Audio for Flawless Hybrid Meetings
The first real test of a conference room usually happens five minutes into a live call. Someone at the far end says the room sounds hollow. A person near the wall disappears from the conversation. Another attendee hears their own voice coming back through the speakers. At that point, the issue is rarely “bad equipment.” It is usually a setup problem. Mic coverage, speaker placement, room acoustics, and DSP tuning were never treated as one coordinated job.
Audio deserves more planning than clients expect because hybrid rooms ask the system to do two jobs at once. People in the room hear each other naturally. Remote participants hear a processed version of that same conversation through microphones, speakers, echo cancellation, noise reduction, and the conferencing platform itself. If any part of that chain is wrong, the meeting feels harder than it should.
Why audio breaks down
In the field, the same mistakes show up again and again.
Ceiling mics get installed too high for the room size. Table mics get pushed to the far end because they “look cleaner.” Speakers end up too close to pickup zones. Glass walls and hard tables throw reflections back into the microphones. Then someone raises gain to compensate, and the room gets louder, harsher, and less intelligible.
The business outcome is simple. People repeat themselves, remote attendees disengage, and important calls lose momentum.
Build for conversation parity
A good hybrid room lets remote participants follow the conversation without strain. They should not have to guess who spoke, ask for repeats, or listen through constant room noise.
That standard affects every design choice:
- Microphone placement: Put pickup as close to talkers as the room design allows. Distance is the enemy of speech clarity.
- Speaker placement: Keep far-end voices anchored to the front of the room or the main discussion area so the conversation feels natural.
- Coverage strategy: Match the mic type to the table shape, ceiling height, and seating behavior. One larger mic array is not always better than two smaller, well-placed zones.
- Acoustic treatment: Add absorption in reflective rooms. Even limited treatment on the right surfaces can clean up speech more than a spec upgrade.
- Gain structure: Set levels so normal speech is enough. A room that requires people to “project” is already tuned wrong.
I usually tell clients to judge audio by behavior, not by hardware count. If people speak at a normal volume and remote participants stop interrupting with “say that again,” the room is working.
DSP tuning is where good designs succeed or fail
DSP is not a box to check on a proposal. It is the part that decides whether the room stays intelligible once real meetings start.
In larger rooms, divisible spaces, and executive rooms with multiple audio devices, DSP handles acoustic echo cancellation, routing, automixing, EQ, dynamics, and output tuning. Auto settings can get a system running. They rarely get it polished. The difference shows up when two people talk over each other, when one seat is much louder than another, or when a laptop joins the room call and creates a second audio path.
For teams dealing with repeat loopback or reflection problems, this guide on how to remove echo from audio is a useful troubleshooting reference.
Power quality matters too. If the room includes amplifiers, DSPs, or dedicated AV circuits, electrical consistency affects reliability more than many first-time buyers realize. Facilities teams that are reviewing that side of the project may also want this guide for industrial electrical solutions.
Tune the room with actual meeting behavior
Installer voice is not a valid test. A quiet technician standing at the table and counting to ten does not tell you much.
Use several people with different speaking volumes. Put one participant on the far end. Have people shift in their seats, interrupt each other, and speak from the least favorable positions in the room. Test with the HVAC running and the display on. If the room supports content sharing from a laptop, test that at the same time. Hybrid failures often appear only when the system is handling real conversation and multiple active sources together.
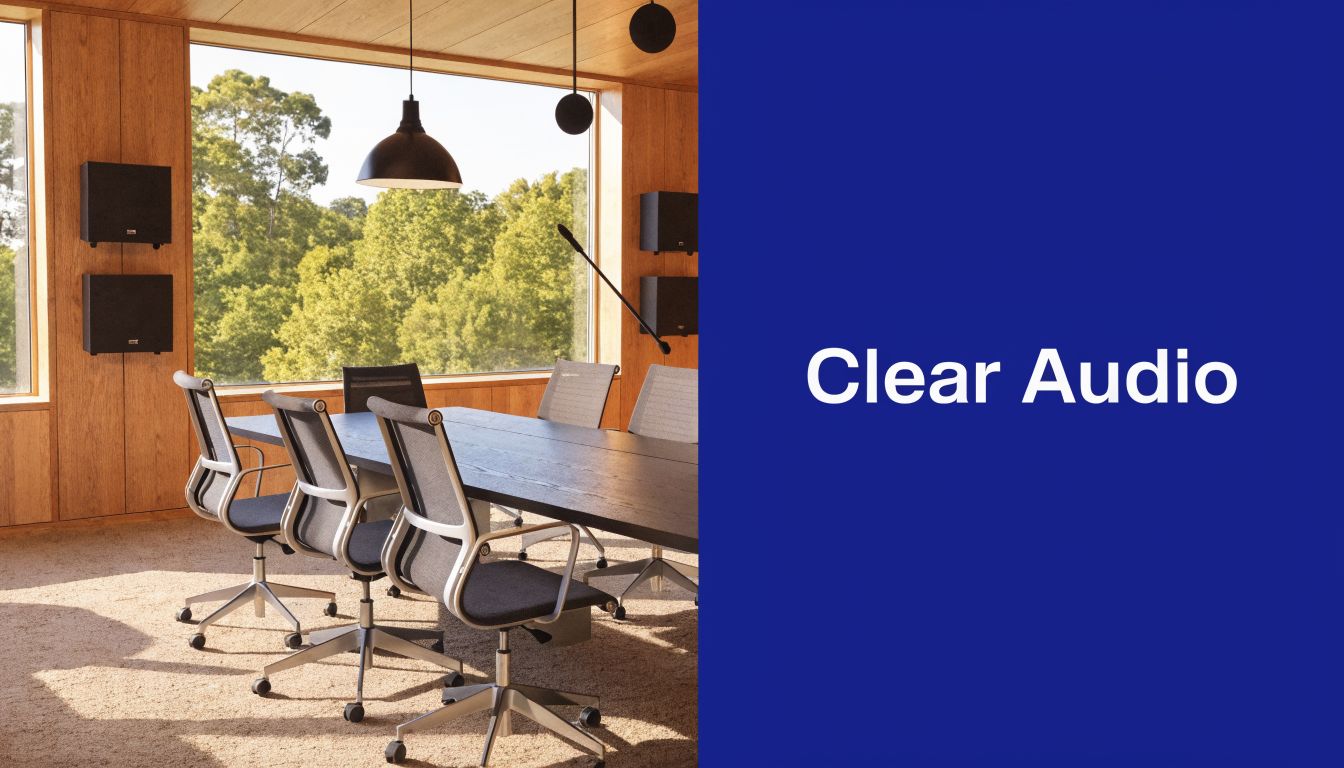
A short acceptance call misses too much.
Here’s a visual walkthrough that helps illustrate how room audio and layout decisions shape the experience in hybrid spaces:
What actually works in the field
The rooms that perform best usually have simpler signal flow, better mic geometry, and more time spent on tuning. They do not always have the longest equipment list.
That means accepting a few trade-offs. Visible microphones can outperform hidden ones. A small amount of acoustic treatment can do more than swapping to a more expensive mic. Separate zones for presenters and table participants often beat a one-size-fits-all pickup plan. Good conference room setup is project management here as much as product selection. The audio system has to be coordinated with the room layout, furniture, acoustics, and user habits, or the far end will hear every shortcut.
If the result is clear speech, stable call audio, and no more choppy or echo-filled meetings, the room is doing its job.
Pre-Launch Testing and User Adoption
Monday at 9:00 a.m., the executive team walks into a brand-new room for the first client call. The display wakes up, but the meeting won’t join on the first tap. Someone starts troubleshooting. The first five minutes are gone, and confidence in the room drops before the conversation even starts.
That is why pre-launch matters. A conference room setup succeeds only when the install, configuration, testing, documentation, and handoff all work together. The gear can be perfectly spec'd and still fail the business if people avoid the room because it feels unpredictable.
Test the room the way it will actually be used
A quick commissioning check is not enough. Run the room through real meeting conditions with people who did not build it. They will press the wrong button, sit in odd seats, join late, share the wrong screen, and ask the room to recover fast. That is useful. It exposes the gaps before your staff does.
Use a checklist tied to actual workflows:
- Start a scheduled meeting from the room controller: Confirm the calendar entry appears correctly and the room joins without extra steps.
- Place and receive a test call: Verify far-end audio, local playback, camera switching, and mute behavior.
- Share content the two or three ways users will try first: Test the HDMI ingest, USB-C path, and wireless sharing only if you are offering all three.
- Switch between meeting modes: Move from native room mode to BYOD, then back again, and confirm the system returns to a known state.
- Test recovery: Reboot the touch panel, disconnect a user cable, drop the network briefly if your environment allows it, and confirm the room comes back cleanly.
- Check the support path: Make sure the help number, QR code, or service instructions in the room point to a real response process.
One failed handoff can undo a lot of good design.
I usually tell clients to include one person from operations, one regular employee, and one remote participant in acceptance testing. The integrator checks whether the system is functioning. Those three users show whether the room is ready for work.
Train for repeatable behavior
User adoption has less to do with feature count than with predictable steps. If people can walk in, tap once, share content, and leave without guessing, the room gets used. If the room offers six connection paths and only two work consistently, support tickets follow.
Keep the room guide short. Use photos of the actual touch panel, table connections, and any adapters stored in the room. Show the sequence in plain language: start meeting, present content, mute audio, end call, get help. A laminated one-pager in the room still works better than a ten-page PDF nobody opens.
Power users help, but choose them carefully. Pick employees who host meetings often and are calm under pressure. Give them a 15-minute walk-through after commissioning so they know the room’s intended workflow, not just where the buttons are.
Use the first month to finish the project
Launch day is not the end of the job. It is the start of the proof period.
The first few weeks usually reveal issues that did not show up during installation. A camera preset may frame the table well but miss a presenter standing near the display. A wireless sharing option may create confusion in a room where a single USB-C cable would have been faster. A touch panel label may be technically correct and still make no sense to a visitor.
Treat that feedback like project closeout, not random complaints. Log what users struggle with, sort it into training issues versus system issues, and fix the easy items quickly. In practice, a small round of post-launch changes often delivers the biggest gain in day-to-day reliability, because it aligns the room with how your staff meets.
If the result is simple to start, easy to recover, and consistent from room to room, adoption follows. That is the outcome that matters.
Maintaining and Future-Proofing Your Setup
A conference room isn’t a one-time install. It’s an operating system for meetings, and it needs maintenance.
The simplest maintenance plan is quarterly. Check cable strain and connector wear. Clean camera lenses and touch surfaces. Confirm microphones haven’t been moved into bad positions. Review firmware and software updates for displays, cameras, room controllers, and conferencing appliances. Those updates often improve compatibility, stability, and call behavior without requiring any hardware change.
Keep the room modular
The rooms that age well are usually built from standards-based components with clear replacement paths. USB peripherals, flexible compute options, documented cable routes, and non-proprietary control logic make future upgrades much easier.
That same maintenance mindset applies to the electrical side of commercial spaces too. For teams responsible for broader facility reliability, this guide for industrial electrical solutions is a useful reminder that system longevity comes from routine checks, not last-minute fixes.
Review the room like an asset
Don’t wait for a failure to evaluate whether the room still fits the business. Revisit each space based on how people use it now. A formal boardroom may need to become a training room. A lightly used large room may make more sense as two smaller spaces. A room built around one meeting platform may need a more flexible connection model later.
That’s the long-term view that makes a conference room setup pay off. Plan it like a project, launch it like a system, and maintain it like infrastructure.
If you're replacing an old phone system and want your conference rooms, calling, and everyday communications to work together instead of as separate tools, SnapDial gives growing teams a practical cloud PBX foundation with conferencing, calling features, and white-glove setup support that fits real-world business use.