

The phones are on the desks, the switch lights are blinking, and someone wants to know when they can start taking calls. One handset starts normally, another won't register, and the remote employee's phone still shows its old extension. Entering SIP passwords again won't fix all of those problems.
A reliable Yealink phone setup starts with the deployment method and voice network, not the account screen. Choose how settings will reach each device, confirm the hardware fits your phone platform, and prove the network path before you start changing individual fields.
Pick the Setup Method That Fits Your Phones
| Method | Best For | What You Need | Main Risk |
|---|---|---|---|
| Manual web interface | One to five phones at one site, as a practical starting point | Phone IP address, SIP account details, admin login | Repeated typos and no central configuration record |
| Phone menu configuration | A single desk phone with no computer nearby | Phone keypad access and SIP account details | Slow entry and password mistakes |
| Static TFTP or HTTP provisioning | Fleets sharing a provisioning server | Server plus compatible boot and configuration files | Wrong model file can cause reboot loops |
| DHCP options 66 and 43 | Many phones on one network | DHCP server access and correctly scoped options | Scope errors send phones to the wrong server |
| Zero Touch or PnP | Units shipped to remote sites | Supported model and reachability to the discovery service | Unsupported discovery or blocked outbound access |
Count the phones, count the sites, and identify who controls DHCP. The table is an operational rule of thumb, not a manufacturer limit. A small, stable office can finish faster by hand; distributed phones need a repeatable way to receive changes.
Yealink's company profile describes its international business-communications footprint. For installation planning, the useful distinction is individual configuration versus centralized deployment, rather than the brand's size or history.
Choose the source of configuration
Decide whether the phone interface or provisioning server will hold the authoritative settings. Mixing local edits with a managed template creates confusion when the next provisioning cycle overwrites a technician's changes.
Check whether your network uses IPv4, IPv6, or dual-stack addressing before selecting discovery and server access methods. Don't assume a reachable server from your laptop is reachable through the phone's selected addressing mode.
Practical rule: Use manual configuration when you can maintain an accurate device record without chasing changes. Use provisioning when consistency matters more than avoiding server setup.
Check Firmware and Model Compatibility First
A phone that powers on isn't necessarily a phone you can use. This matters especially when buying refurbished hardware: the case may look right while the installed platform, conversion restrictions, or management requirements make it unsuitable.
Record the following before purchasing or upgrading:
- Exact model and hardware revision: Read the device label, not just the seller's listing.
- Current firmware branch: Capture the complete version from the status screen.
- Platform edition: Establish whether the device runs SIP or Teams firmware.
- Target requirements: Confirm platform support, licensing, and the documented conversion path.
- Recovery options: Obtain the appropriate recovery instructions and approved firmware files.
Confirm the conversion path before upgrading
Yealink's Teams and SIP conversion guidance documents transition-firmware requirements for some devices and restrictions affecting certain CP965 devices running Android 12 or later, which cannot convert directly from SIP to Teams. Treat those as device-specific restrictions, not a universal conversion procedure.
For a Teams deployment, also check the Microsoft administration portal requirements and endpoint-management policies. A successful local startup doesn't prove the device can enroll under your organization's policies.
Before buying replacements, use a business VoIP phone comparison to narrow the hardware choices, then validate the exact edition against your intended platform.
Export the current configuration before making changes. Keep the approved existing firmware package where available, along with the proposed upgrade and release notes; a configuration export isn't a firmware backup.
Don't cross-flash a similar-looking model. A mismatched image can leave the phone unusable, and a newer release isn't automatically more flexible. Follow this decision order: choose the target platform, verify the supported conversion path, establish recovery options, and schedule the change during a maintenance window.
An upgrade plan without a supported rollback path is an acceptance of downtime risk, not a recovery plan.
Prepare the Voice Network Before Phones Connect
A VLAN mismatch can make a phone look dead even though it has power and an Ethernet link. If the phone sends traffic into a VLAN the switch doesn't carry, provisioning and registration fail before audio quality becomes relevant.
Yealink's VLAN guidance states that VLAN is disabled by default and documents VLAN IDs from 1–4094 and priority values from 0–7, with 7 highest. Obtain the voice VLAN assignment from the network owner rather than inventing a new value at the handset.
Keep the phone and switch configuration visible while validating the network.
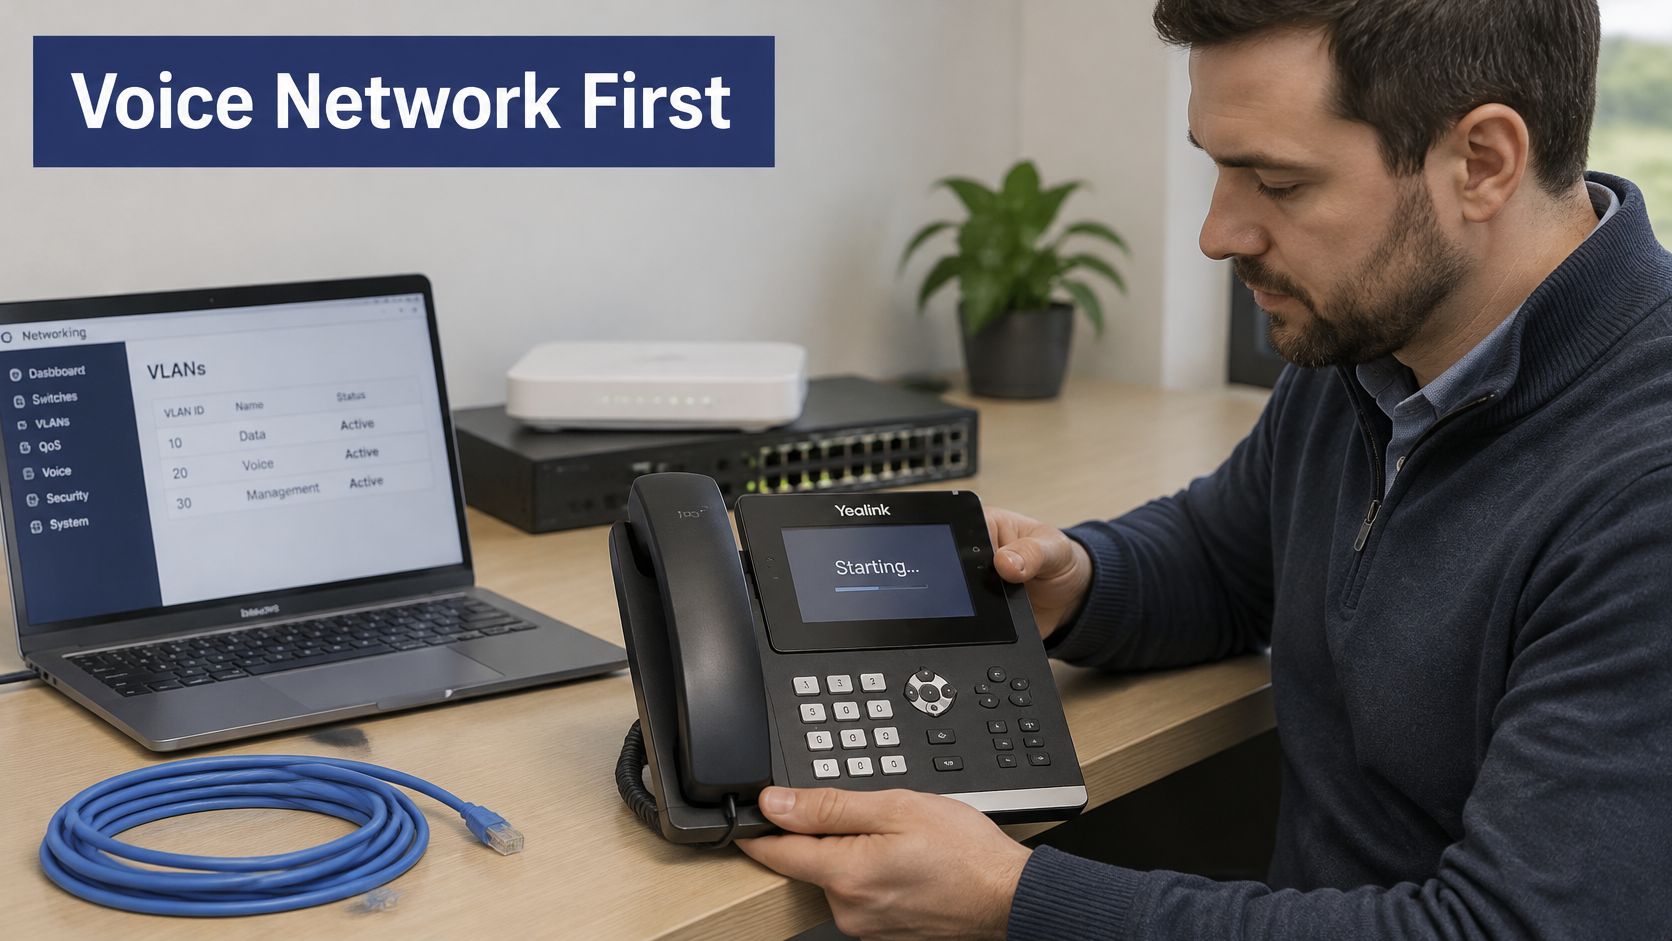
Establish the path before applying priority
Confirm whether the switch port carries voice traffic tagged or untagged, then verify that the corresponding DHCP scope and gateway are available. Choose supported discovery through LLDP, CDP, or DHCP, or configure the WAN-port VLAN manually.
Avoid leaving competing discovery mechanisms unexplained. The documented assignment order is LLDP/CDP, manual configuration, then DHCP; an unexpected advertisement can explain why a handset isn't using the value you entered.
Apply the network's approved priority setting, then reboot or renew the lease. If you're responsible for a small office gateway but can't locate its management interface, NeoTeo's guide can help you find your router's configuration page. Don't change shared DHCP settings without confirming who else uses that scope.
| Check Order | Stage | Pass Condition |
|---|---|---|
| 1 | Phone IP address | Phone receives an address in the intended voice subnet |
| 2 | VLAN membership | Switch tagging matches the phone's VLAN configuration and priority policy |
| 3 | DNS and NTP | Provisioning and SIP server names resolve, and the clock is correct |
| 4 | Provisioning retrieval | Phone downloads its intended boot and configuration files |
| 5 | SIP registration | Line shows Registered on the status screen |
| 6 | Two-way RTP audio | A test call carries audio in both directions |
Verify QoS across the path
Configure phone QoS under Network > Advanced > QoS, where available, only after confirming switch classification and queuing. A priority marking doesn't reserve bandwidth or repair an overloaded connection.
Switch trust boundaries, WAN congestion, and provider handling of DSCP and Ethernet priority markings all affect results. Review your VoIP bandwidth requirements alongside actual office usage, especially during uploads and backups.
Change a single test handset first. Validate each stage independently before applying the network configuration office-wide.
How to Set Up a Yealink Phone Step by Step
Use this procedure for a SIP handset that you're configuring manually. Menu names differ by model and firmware, so match the function rather than expecting every screen to look identical.
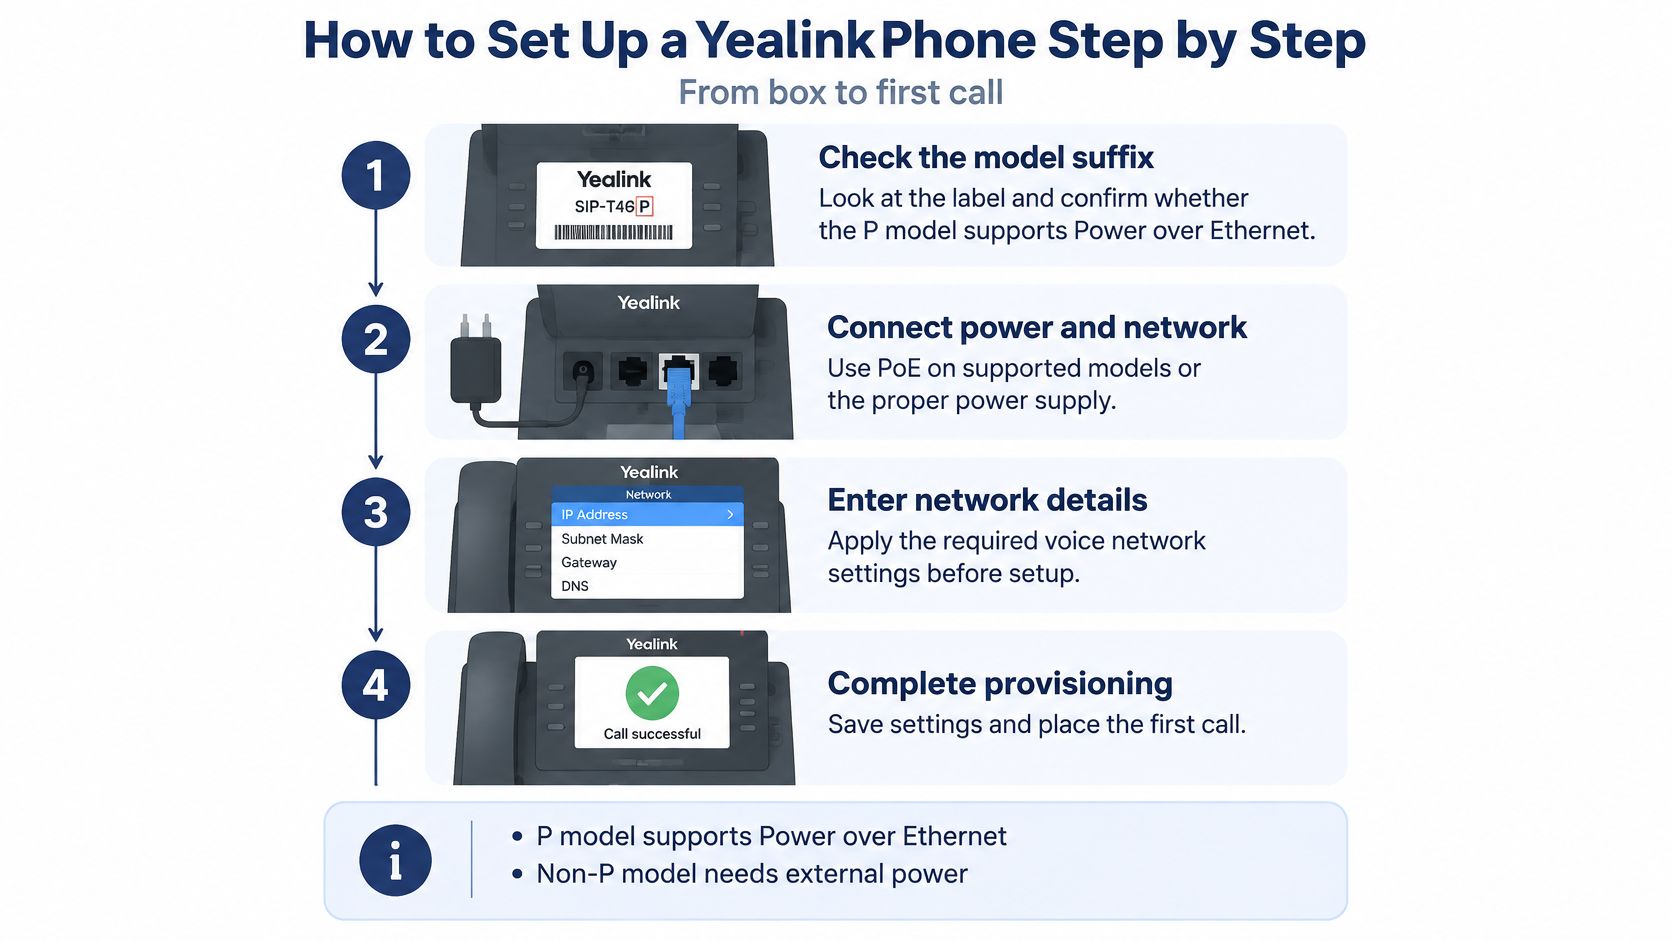
The visual overview shows the installation sequence from the device label to provisioning.
Connect and establish administrative access
Check the model suffix and power specification. The Yealink SIP-T20P quick-start guide identifies PoE support for that model, requires an IEEE 802.3af-compliant PoE hub or switch, and states that initialization begins automatically once network and power are connected. Don't infer power support from appearance alone or assume every model without a P suffix lacks PoE.
Confirm the switch can supply the required power. Check the port's PoE status and available switch power budget, not just whether the switch has some PoE-capable ports. If the handset can't use that supply, connect its approved power adapter rather than a spare adapter with an unverified specification.
Connect Ethernet to the network-facing port and allow startup to finish. Use the port labeled Internet or WAN, as appropriate for the model, rather than the downstream PC port. Don't interrupt initialization because the display pauses or the phone restarts while applying settings.
Read the phone's IP address from its status screen. Open the web interface from an authorized laptop on the same subnet, or through an approved routed management path. If the browser can't connect, check management access and network reachability before changing SIP credentials.
Sign in and secure administration. Use the administrator credentials supplied for the device, replace any default password, and set the correct time zone. Store the replacement password in your organization's password manager, not in an unprotected deployment spreadsheet.
Register and prove calling behavior
Enter the provider-issued SIP account values. Match the server address, username, authentication name, password, and transport, plus outbound proxy settings if specified. The username and authentication name may differ, and the display name or line label doesn't replace either credential.
Save the account and inspect registration status. Confirm that the intended line shows Registered, rather than assuming a saved form means successful authentication. If centralized provisioning already manages the device, update the authoritative configuration instead of making a temporary local correction.
Run the six-point test call sequence. Check an inbound call, outbound call, transfer, voicemail, emergency-call behavior, and a call to another extension before releasing the handset. Coordinate emergency-service validation through the provider's approved test procedure; don't place an unannounced live emergency call.
A healthy handset has a registered line, expected dial tone, and clear audio in both directions. Test the actual accessories too, using a compatible headset for your Yealink phone when the user works primarily through a headset.
For a visual walkthrough, use the video alongside the model-specific instructions.
Record screen names, required fields, and test results in your deployment runbook. Trupeer Inc.’s technical documentation resource is relevant when turning that procedure into instructions another administrator can follow, but keep passwords out of screenshots.
Deploy Phones at Scale with Auto-Provisioning
For a fleet, the configuration server should determine what each phone receives. The important change isn't faster password entry; it's being able to identify, reproduce, and reverse a deployment.
Use this workflow to connect device records, server files, and deployment status.
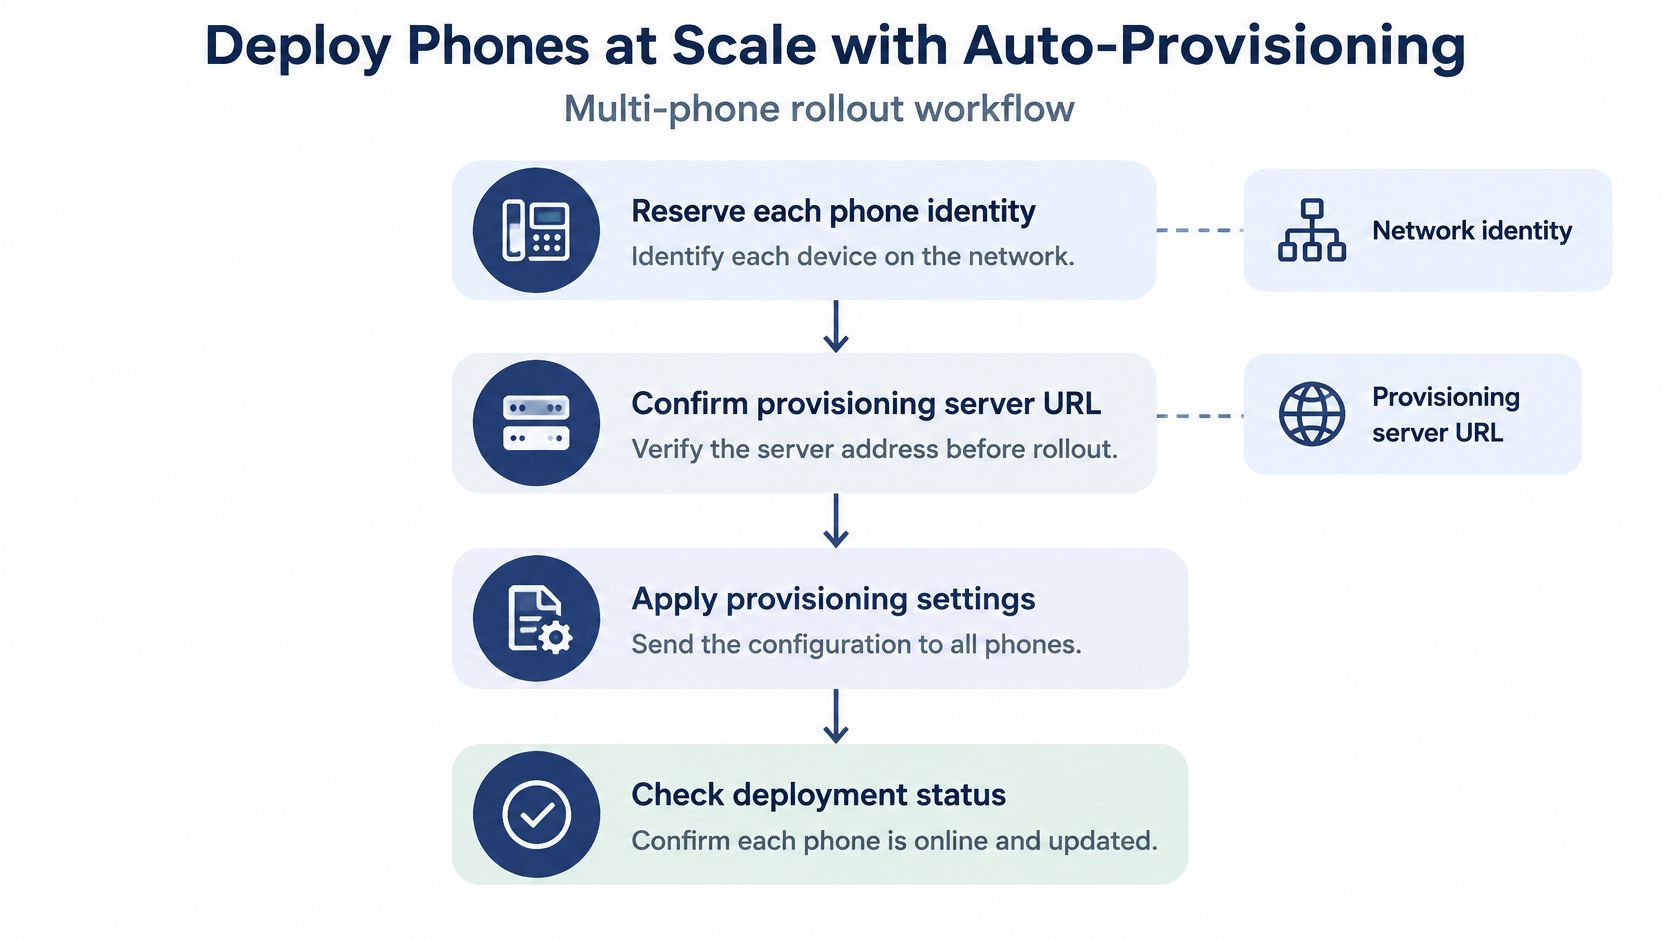
Build a traceable configuration chain
Start with a device inventory containing the model, firmware family, MAC address, site, and assigned user. Keep device identity separate from user identity so a handset replacement doesn't require rebuilding the employee's entire account record.
Confirm the provisioning-server URL, then prepare its boot, configuration, and resource files. For a TFTP deployment, put them in the server's configured root, start the service, and verify that the intended files are readable from the phone network.
Yealink's provisioning documentation describes boot and configuration file delivery and IPv4 discovery through a custom DHCP option, Option 66, or Option 43. It also documents discovery priority in which Zero Touch and PnP can precede DHCP, so a correct DHCP option alone doesn't prove which server the phone will contact.
Structure the files around their responsibilities:
- Shared template: Standardize codecs, dial plans, feature keys, and approved firmware policy.
- Device-specific configuration: Apply model-appropriate settings and device exceptions.
- User variables: Assign the extension, authentication identity, and account password.
Prove retrieval before expanding the rollout
Trigger auto-provisioning on the pilot devices and inspect the server log. Confirm the requesting device, requested filename, successful retrieval, and resulting configuration on the handset.
A phone obtaining an address isn't evidence that it downloaded settings. Conflicting provisioning methods or the wrong model-specific boot file can leave old credentials in place or cause repeated restarts.
Restrict access to configuration files containing passwords, and use supported configuration encryption. Don't treat TFTP as a protected credential-delivery channel because it runs inside the office.
Deployment checkpoint: Approve the rollout only when the downloaded file, applied account, and calling behavior all match the device record.
Retain the previous configuration set and document how to restore its provisioning reference. Validate the pilot group's calling functions before broad deployment, and monitor later requests for devices that missed the update or continue asking for obsolete files.
Fix Registration and Provisioning Failures
A phone with a valid address but no registration is a useful diagnostic starting point. Power and basic network attachment are working, but the failure could still be configuration retrieval, name resolution, server reachability, or authentication.
Don't change all of those at once. Capture the status screen and the failed operation before applying a correction.
| Symptom | Likely Cause | Fix |
|---|---|---|
| No IP address | Wrong VLAN or DHCP scope | Match the switch port VLAN and renew the lease |
| Address but no settings downloaded | Bad provisioning URL or wrong model file | Inspect the server log and serve the file for the correct model |
| Old or wrong account settings | Stale configuration or an overriding file | Update the authoritative file, reprovision, and verify the account |
| Repeated reboots | Configuration or firmware mismatch | Restore the last known good supported configuration and firmware |
| Registered but one-way audio | Blocked RTP traffic or a NAT issue | Permit the required RTP range between intended endpoints and inspect NAT |
| Authentication failure | Wrong username, password, or domain | Correct the account fields and confirm the issued credentials |
Read the evidence in order
Start with Status, then inspect provisioning logs for the requested filename and a successful transfer. A missing-file response calls for a filename or root-directory correction, not a new SIP password.
Compare the retrieved configuration with the actual model and firmware family. Then inspect the account's Register Name or Authentication Name, User Name, Password, Server Host, and Domain, using the labels available on that firmware.
Account corrections generally become visible at the next registration attempt. A discovery or provisioning-path correction may require another provisioning trigger, a reboot, or a lease renewal, so judge success by the resulting log entry rather than an arbitrary waiting period.
For one-way audio, inspect the negotiated media addresses and the provider-required RTP policy. Don't expose the phone's web interface or broadly forward ports as a shortcut.
Stop repeated changes and recover
Set a stop condition before a firmware push. I would stop after repeated unsuccessful boots with the same new image and restore the approved baseline rather than continue experimenting on a production handset.
Use a factory reset only after supported rollback has failed, and only when you have the credentials and provisioning information needed to rebuild the phone. A reset can erase evidence without fixing the server that supplied the bad configuration.
For network-related symptoms, follow the voice-network validation order rather than skipping directly to account changes. Record the final cause and correction so the next technician doesn't repeat the same investigation.
Decide Whether to Manage Setup In-House or Hire Help
The first working phone proves the installation can succeed. It doesn't prove your team can maintain every handset through staff moves, replacements, and network changes.
Choose ownership around the environment you operate in, not just the initial installation effort.
| Criterion | In-House Management Fits | Managed Deployment Fits |
|---|---|---|
| Phone count | A small inventory with a maintained configuration record | A fleet needing consistent updates and replacement procedures |
| Site count | A single office with straightforward administrative access | Multiple offices or remote locations with different network owners |
| Assignment changes | Stable users and infrequent desk moves | Frequent onboarding, reassignment, and device replacement |
Include access and recovery in the cost
Manual administration requires an authorized path to each phone's management interface, typically local network access or a VPN. For remote employees, arranging that access can take more effort than entering the SIP account.
Yealink's provisioning-server guidance covers server preparation, file distribution, permissions, and optional configuration encryption. Those responsibilities remain necessary whether your own administrator or an outside team performs them.
Keep management in-house when someone owns the inventory, credential storage, approved templates, and recovery procedure. Hiring help makes sense when those duties fall between an office manager, an internet contractor, and employees working from home.
Our technicians handle setup, configuration, and replacement of a business's existing VoIP phone system from start to finish, at no cost to the customer. Contact our support team at (888) 881-7495 or help@snap-dial.com to confirm current service scope and pricing for your situation.
This week, run the six-point test call sequence on a pilot handset and record the results. Then assign an owner for every future configuration change and choose the management approach that owner can realistically sustain.
Our team can handle the setup, configuration, and replacement work needed to move your business phone system forward without leaving you to configure every handset yourself. Visit SnapDial to discuss your Yealink models, office locations, and calling requirements, and confirm the right deployment approach before rollout.